How to Add a custom HTML Audio Player in Blogger website

Are you running a Blogger Blog and want to add an HTML audio player to your website, then I got you covered. In this article, I will be showing you how you can add a Custom-designed Audio player to Blogger website easily.
Here, I have designed 3 different ways to add the mp3 player in Blogger.
Here, I have used HTML and CSS only to build this player which is quite fast in loading and looks quite good. It is mobile responsive and fits the screen size accordingly.
As you know there is no way to upload an Audio file in Blogger and That’s why it is not easy to add an audio player in Blogger. But, after reading this blog, you will be able to add this easily.
Add Audio Player in Blogger
Audio Player 1

To add the audio player you need an image and an audio file which should be hosted on cloud storage like Google Drive.
Then you have to change the Drive link into a direct download link or you can replace the file id with the current one given below.
You can use our Google Drive direct Link Generator tool for that.
Now go to the Blogger dashboard, open the post in HTML view and paste the below HTML and CSS code in it.
<div class="HTML_Audio_player">
        <div class="Audio_Player_image"><img style="border-radius: 60px;" src="https://i1.sndcdn.com/avatars-000279088807-w6845m-t200x200.jpg" /></div>
      <div class="player-content">
         <div class="player-info">
            <a class="song-name" target="_blank" href="https://youtu.be/BWdZjZV6bEk">Kontinuum - Aware [NCS Release]</a>
            <a class="artist" href="#">NCS SONGS</a>
         </div>
         <div class="k2_audio_player">
            <audio controls style="width: 80%;">
  <source src="https://drive.google.com/uc?export=download&id=1r_TZWVoEhAKUGI4MzrLvpoQGgfo8s_On" type="audio/mpeg"/>
</audio>
         </div>
      </div>
   </div>

   <style>
       .HTML_Audio_player { z-index:10;
         background: linear-gradient(135deg,#f4f8ff 0,#f4f8ff 49%,#e5efff 49%,#e9e8f2 100%);
         color: inherit;
         min-height:120px; max-height:150px;
         display:flex;
         box-shadow: rgba(0, 0, 0, 0.16) 0px 3px 6px, rgba(0, 0, 0, 0.23) 0px 3px 6px;
         flex-direction:row;padding: 20px 10px 20px;}

     .Audio_Player_image { width:150px; display: flex; justify-content: center; }
     .player-content {
       flex-grow:1;
       display:flex;
       flex-direction:column;}

     .player-info {
       flex-grow:1; display:flex;
       flex-direction:column;
       justify-content:center;
       padding-left:10px;}

     .song-name { font-size:18px; font-weight:600; } .k2_audio_player { display:flex;}

     audio { flex-grow:1; height:40px; }

     audio::-webkit-media-controls-play-button {
     background-color: #B1D4E0;
     border-radius: 50%;}

     audio::-webkit-media-controls-play-button:hover {
     background-color: rgba(177,212,224, .7);}

     audio::-webkit-media-controls-panel {
     background: #e9e8f2;}

     .Audio_Player_image img:hover{animation:rotating 3s linear infinite} @keyframes rotating{from{transform:rotate(0deg)}to{transform:rotate(360deg)}}
     </style>
Now you have to change the Audio file name, artist name, audio file image, and the source link of the audio file.
Now the HTML audio player will be added to your Blogger website.
The process of Adding the other two custom Audio is almost the same.
Audio Player 2
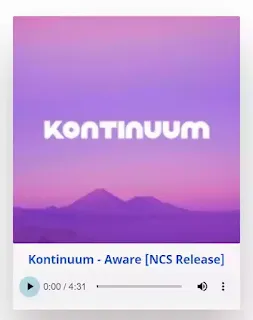
<div class="HTML_Audio_player">
        <div class="Audio_Player_image">

         <img src="https://i1.sndcdn.com/avatars-000279088807-w6845m-t200x200.jpg" /></div>
  <div class="k2_audio_info">
    <a class="song-name" target="_blank" href="https://youtu.be/BWdZjZV6bEk">Kontinuum - Aware [NCS Release]</a>
    <p style="text-align: center; padding:0px 10px 0px;"> Lorem ipsum dolor sit amet, consectetur adipiscing elit, sed do eiusmod tempor incididunt ut labore et dolore magna aliqua. Ut enim ad minim veniam, quis nostrud exercitation ullamco laboris nisi </p>
  </div>
         <div class="k2_audio_player">
            <audio controls>
  <source src="https://drive.google.com/uc?export=download&id=1r_TZWVoEhAKUGI4MzrLvpoQGgfo8s_On" type="audio/mpeg"/>
</audio>
         </div>
      </div>

<style>

  .HTML_Audio_player{
  Position: relative;
    width:350px;
    background: #faf3f4;
    box-shadow: 0 50px 80px rgba(0,0,0,0.25);
  }

  .HTML_Audio_player .Audio_Player_image{
   position: relative;
    width:100%;
    height: 350px;

  }

  .HTML_Audio_player .Audio_Player_image img{
   position: absolute;
    top:0;
    bottom: 0;
    width: 100%;
    height:100%;
    object-fit: cover;

  }

  .HTML_Audio_player audio {
  width: 100%;
  outline: none;
  }

     .song-name { font-size:18px;
       font-weight:600;
       display: flex;
        justify-content: center;
        margin-top: 10px;
  }
  audio::-webkit-media-controls-play-button {
     background-color: #B1D4E0;
     border-radius: 50%;}
</style>
Here you can add a short description to the audio player or remove it if you don’t want it. You can also change the width and height of the image, box-shadow effect by modifying the CSS code.
Note: if you don’t want to paste the CSS code in all blog posts then you can paste the CSS code (<style> CSS code </style> ) just above the </body> tag in the theme file.
Audio Player 3
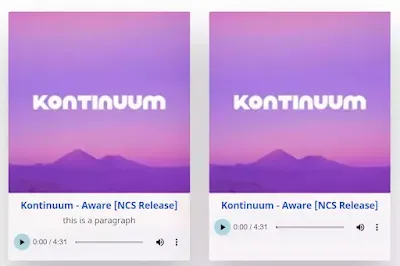
Here I have actually added multiple audio players and created a grid-style design. If you want to Display multiple audio players then this is going to help you.
<div class="audio_Player_grid">
<div class="HTML_Audio_player">
<div class="Audio_Player_image">
<img src="https://i1.sndcdn.com/avatars-000279088807-w6845m-t200x200.jpg" /></div>
<div class="k2_audio_info">
<a class="song-name" target="_blank" href="https://youtu.be/BWdZjZV6bEk">Kontinuum - Aware [NCS Release]</a>
</div>
<div class="k2_audio_player">
<audio controls>
<source src="https://drive.google.com/uc?export=download&id=1r_TZWVoEhAKUGI4MzrLvpoQGgfo8s_On" type="audio/mpeg"/>
</audio>
</div>
</div>
</div>
<style>
.audio_Player_grid{
display: flex;
flex-wrap: wrap;
justify-content: space-evenly;
}
.HTML_Audio_player{
Position: relative;
width:350px;
background: #faf3f4;
box-shadow: 0 50px 80px rgba(0,0,0,0.25);
margin-top: 10px;
margin-bottom: 10px;
}
.HTML_Audio_player .Audio_Player_image{
position: relative;
width:100%;
height: 350px;
}
.HTML_Audio_player .Audio_Player_image img{
position: absolute;
top:0;
bottom: 0;
width: 100%;
height:100%;
object-fit: cover;
}
.HTML_Audio_player audio {
width: 100%;
outline: none;
}
.song-name { font-size:18px;
font-weight:600;
display: flex;
justify-content: center;
margin-top: 10px;
}
audio::-webkit-media-controls-play-button {
background-color: #B1D4E0;
border-radius: 50%;}
</style>Here you can also add paragraphs like the audio player 2.
If you are a visual learner then you can watch the below video to know how to add a custom HTML mp3 player in Blogger.
I hope this article helps you add a custom music player to the Blogger website.
If you have any doubts feel free to ask me in the comment section. If you want to get the updates you can join our Telegram Group.
If you have any Blogger-related problems, feel free to ask me in the comment section, I will try my best to solve your problem.
If you want more Blogger tutorials then you can watch the whole Blogger playlist on YouTube. Thank You. 🙂



Mobile view is not good for audio player.is there any solution
which among the three are you using. Can you share the screenshot in our Telegram Group. so, I can see the exact problem.
Hi dear how change the image in audio ?
Watch the video tutorial, I have show it. You have to upload an image to blogger and then use the image URL in src field.
You deserve heaven for what you did! I spent hellish months looking for a music player! You are great! Thank you! Know that it made me happy!!!
How can I add multiple radio channels to my blogger website? I will be very helpful if you explain to me.
I am waiting for your help.